Redis object cache allows WordPress to keep frequently used database data in memory. This reduces repeated database queries and can improve the performance of dynamic WordPress and WooCommerce pages.
Availability: Redis is available depending on your hosting plan. Only use the UNIX socket settings below when Redis is enabled for your plan.
Before you begin
- Log in to the WordPress administration area for the relevant website.
- Make sure the LiteSpeed Cache plugin is installed and activated.
- Do not run a second Redis or object-cache plugin at the same time.
Configure Redis object cache
- In WordPress, open LiteSpeed Cache > Cache > Object.
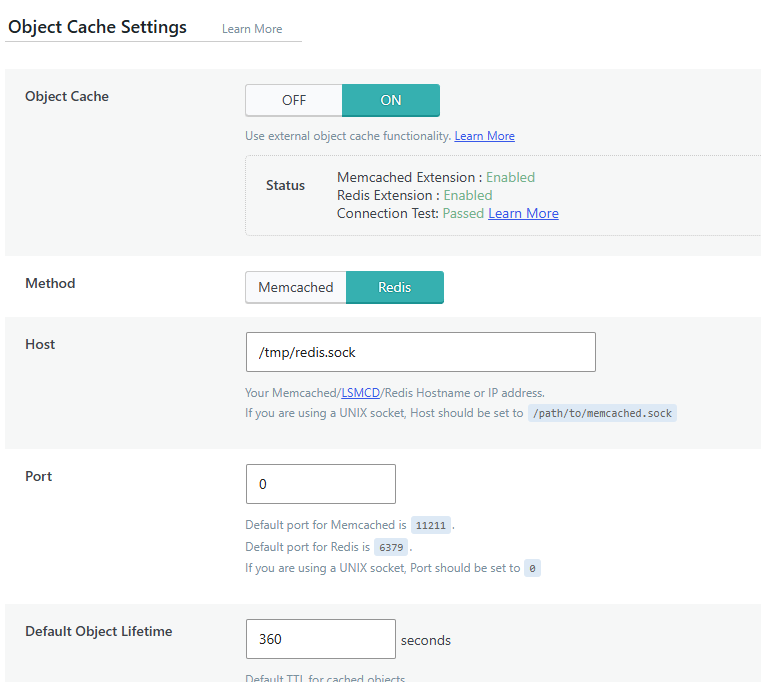
- Set Object Cache to ON.
- Set Method to Redis.
- Enter exactly
/tmp/redis.sockin Host. - Enter
0in Port. Port 0 is required for a UNIX socket; do not use port 6379 here. - Leave Default Object Lifetime at
360seconds. - Leave username and password empty unless Gigatech has explicitly provided different credentials.
- Leave the remaining settings at their defaults unless Gigatech recommends otherwise for your website.
- Click Save Changes.
Example of the correct settings
Verify that Redis is working
After saving, the status panel should show:
- Redis Extension: Enabled
- Connection Test: Passed
Then clear the LiteSpeed cache through LiteSpeed Cache > Toolbox > Purge > Purge All.
Troubleshooting
If the connection test shows Failed, verify the following:
- Host is exactly
/tmp/redis.sock. - Port is exactly
0. - Method is set to Redis.
- Redis Extension shows Enabled.
- Redis is included and enabled for your hosting plan.
Never change the permissions of /tmp/redis.sock yourself. If the connection still fails, contact support@gigatech.nl and include the affected website.
Further technical background: official LiteSpeed documentation.